Hello guys...... I’m Mike Robertson.
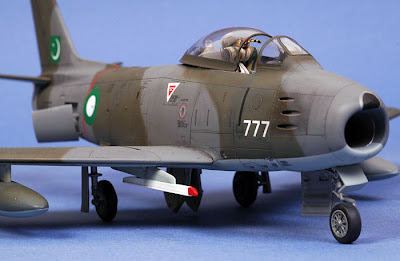
I will share experience when building Canadair Sabre Mk.6. The basis of this
kit is the Hasegawa Luftwaffe Sabre that included resin wingtips to reduce the
span thus providing the slatted 6-3 wing. The markings are from On Target
Decals sheet number MA-48120 which feature aircraft profiled in On Target
Profiles No.6, North American, Canadair, and Commonwealth F-86 Sabre from RAF,
RCAF, RAAF, SAAF, Pakistani AF, and Royal Malaysian AF service, published by The Aviation Workshop
Publications and authored by Jon Freeman.
Generally, the kit went together quite well with light filling required
at the lower wing to fuselage joins. The nose cone caused some difficulty due
to the larger circumference of this part in relation to the attachment area on
the forward fuselage. Considerable sanding was required to obtain a good
finish. The resin wing tips were a generally poor fit overall being thinner in
section and a butt fit as provided. Holes were drilled in the resin tips and
area of the wing where they join to provide strength by inserting plastic rod.
This was followed by a coat of filler to increase the tip thickness to match
the wing and the inevitable sanding, filling, sanding process to obtain an even
thickness. The scoop found on the right fuselage adjacent
to the speed brake was removed as this is appropriate for the F86F-40 Sabre of
the JASDF.
The ‘sugar scoop’ intakes were made from plastic strip and square
stock and slowly shaped to match photos. The Sabre featured is an ex-Luftwaffe
jet and featured a Martin Baker ejection seat. The seat used in the kit is from the Hasegawa F-8E Crusader and
modified to represent the seat fitted to Luftwaffe Sabres.
The author notes that the ex-Luftwaffe Sabres flown by the Pakistani Air Force may have retained their
Luftwaffe colours. This is the choice I made and I welcome information from any
modeller that can shed some light on the subject as I am planning a similar
project in 1/32 scale. Xtra colour Luftwaffe enamels were used to paint the kit. The
initial coats of each colour were lightened with white then weathering was
applied with darker tones of the colours to reflect the appearance of the
aircraft operating in the climate of Pakistan. The decals were applied using
Micro set and sol with no adverse reactions. The decals were in register apart
from one minor inconsistency with one roundel. A final coat of Testor's
semi-matt varnish was applied to seal the decals.
I am quite happy with the end
result in general. I didn’t quite get the sit of the open
speed brakes right and the ‘sugar scoops’ look a little too big but then, that
leaves me room for improvement. Many thanks to Jon Freeman for the inspiration
from the book and, the Pakistani Air Force for painting their Sabres. If you want to build Pakistani F-86 Sabre Mk.6, this kit the best choice...


Tidak ada komentar:
Posting Komentar